Real World Experience, AI Reliable Screening for Abnormal in Chest X-Rays

Recently a Prospective Study was Done at Aarthi Scans, India to understand the effects of AI implementations in Real World. The Abstract is as follows…

Methods: A team of radiologists used the AI-based chest X-ray screening tool (qXR) as a part of their daily reporting routine to report consecutive chest X-rays for this prospective multicenter study. This study took place in a large radiology network in India between June 2021 and March 2022. 

Results: A total of 65,604 chest X-rays were processed during the study period. The overall performance of AI achieved in detecting normal and abnormal chest X-rays was good. 

  • The high negatively predicted value (NPV) of 98.9% was achieved.
  • The turnaround time (TAT) decreased by about 40.63% from pre-qXR period to post-qXR period. 

Conclusions: The AI-based chest X-ray solution (qXR) screened chest X-rays and assisted in ruling out normal patients with high confidence, thus allowing the radiologists to focus more on assessing pathology on abnormal chest X-rays and treatment pathways. For full article please click on this link.

Though this article provides the effectiveness of AI in, but there is more towards it, the role of a Radiology Workflow (RIS) and deconstructed PACS is very critical for results like these in real world scenario.

  1. Routing images from the Modality to a central Server
  2. Quickly decide which AI Model to be used (Dicom Tags / Clinical Data)
  3. Forward the studies to the Specific AI Gateway
  4. Wait for the results, once AI results received,
  5. Based on Diagnosis, draft a report and forward to a Radiologist.

Imagine if the same could be applied on Nighttime CT Brain Head Injury Patients and notify a Preliminary report to the reporting radiologist / requesting physician, this will save precious time / life.

All these benefits are not possible without a basic Radiology Workflow IT solution from InnoWave Healthcare, a real world validated AI model from Qure.ai deployed in synchronization at a care provider like Aarthi Scans & Labs. This is a great collaboration & team effort demonstrated to provide better Patient Care.

https://www.mdpi.com/2075-4418/12/11/2724

COVID-19, Need Telemedicine?


Countrywide lockdown, have put stress on Healthcare institutions. Chronically ill patients need regular consultation with their physicians, live face to face interaction between Patients and Physicians are impossible under current situations. At this time, why not use freely available technology to enable Hospitals to deliver care via Tele-Consultation.

Being a vivid runner, weekends are always about long runs and core sessions, today morning we had our running drills and core session via zoom. The last couple of days, I am using quite a few of mobile-based video calling tools like WhatsApp, Duo, Facetime, hangout, Zoom, GoTo meeting. Though how can we deliver the same to the industry I work for.

The problem is how as a Hospital can provide this at a scale, dealing with multiple locations, many physicians, across specialities, perceptions, logistics, etc.. On the Patient side, the user experience should be simple both on desktop and mobile.

Simple steps to launch Teleconsultation, (eg, Aravind Eye Hospital.)

Tech to building a Teleconsultation Room

  1. Using your hospital webpage. On the home page have a popup to communicate all patients about, general consultation is via Telemedicine. Suggest working days/time.
  2. These days, Gmail account or Google Apps are common in hospitals, use the calendar feature to create a meeting. Schedule a repeat, all-day meeting for working Days / Hours. Each meeting will function like a Telemedicine room. If you have multiple locations and specialities, create many simultaneous meetings.
  3. Each meeting will generate a Hangout Link, this link will not change as long as the repeat attribute is set.
  4. Build a quick Telemedicine page on your website. Provide icons for multiple locations, Specialist and Working Days / Hours. Associate Hangout links to the respective icons.

How a Physician can log in and stay connected. 

  1. Identify a quiet, well-lit room with a decent 15.6″ with HD resolution laptop. Have a good quality Full HD WebCamera facing the Physician, a headset with mic and decent internet (2mpbs). This will ensure proper communication between Patient and Physician.
  2. Open Google Calendar, then Open the respective meeting (Tele-Consultation Room) and click on the Hangout link. This will open up a meet.google.com site, now join the meeting. Since you are the host, you can regulate one patient at a time. Please remember to turn on the Camera and Mic.

How a patient can connect. 

  1. In the current lockdown environment, the tendency of a patient is to log on the Hospitals website to know working hours, through a Popup which will point to a Telemedicine page.
  2. In this page, he will have clear instructions about the Teleconsultation facility. A single page PDF can provide step by step instruction to connect to a Physician. This will greatly help.
  3. The Patient shall click on a link. On the mobile, it will prompt to download hangout. On the desktop, any latest browser will start the Tele-Consultation Immediately.
  4. If the Physician is free and accepts this patient, video consult begins else the patient will wait for the physician’s availability.

Technology, the growth of gRPC and device to device connection via HTTP2 is helping this solution possible without a large server infrastructure, imaging doing this 15 years ago :).

These are some very simple tools and steps to render care during COVID-19 times.

“Boss’s-day-out” – One Day Teleradiology Sprint

One Day Teleradiology Sprint (50 MR studies, 150 minutes at 2 Airports)

We all know how Teleradiology is energizing the community to provide better healthcare. Like the program “boss’s-day-out”, today we had a unique experience. One whole day our team in Delhi & Chennai and me in tire two city of Tamil Nadu – helped a leading radiologist who had to deliver a lecture at ISNR 2014 to perform 50 MR cases in 150 minutes at 2 different Airports.

Two days back we had call from a Radiologist and wanted to know if we can deliver a Teleradiology solution for a day. The moment I got to know the Radiologist, all exited – why, he performs approx. 250 (CT/MR) studies in a given day and every day. This is not hype, this is reality.  This center has reputation of a tertiary care for Radiology studies.

20141012_171506

How do we manage One Day Teleradiology Sprint

Our action plan – is to split into three teams…

  • One team will manage the Teleradiology Gateway in the Diagnostic Center.
  • Two teams respectively in Delhi and Chennai will help the Radiologist in the workflow of our solution. This is important, given the fact the workflow solution and Workstation is completely new to the user.

Preparation at Diagnostic Center.

  • We installed our Freedom.Gateway, a Teleradiology Gateway that will receive the images from Modalities and uploaded all studies to cloud in a more secured and efficient manner.
  • The team in Diagnostic center will keep uploading the studies to our Freedom Teleradiology Platform and map the studies to the Radiologist account.
  • Our team will also enter the relevant clinical history for every study, at instance we did scan and uploaded all referral forms.

Preparation at Radiologist end.

  • The radiologist had a laptop installed with our Freedom.Workstation, this will download all the studies and store locally.
  • The Radiologist at an instance had two laptops, we managed a relay between two Laptos, both had our Freedom.Worksation installed. At a given point in time one was downloading and the other the Radiologist was using for reporting.
  • We achieved this by created a wifi hotspot using a normal Andriod mobile and 3g connection with a leading Telecom service provider. The 3g connection was carefully chosen to provide the best possible speeds in two different geographical locations Chennai and Delhi.
  • Our team managed the complete workflow for the radiologist, like downloading and pushing to the workstation, while the Radiologist was using the other for Reporting.
  • Over a call the Radiologist was dictating the reports. His existing backend and support was so organised and trained on the Reporting entry part of it, pretty impressed with their commitment and efficiency.

Interesting observations

  • Each study on average had 150 images it took only 3-4 minutes to download the complete study in visually loss-less format.
  • He reported total 50 MRs in 150 minutes (1:30 hrs in Chennai Airport and 45 mts in Delhi Airport).
  • The way the wifi hotspot was used, seamless connectivity between two laptops, on a normal android smart phone.
  • We have to commend the effiency of the Radiologist backend support team in capturing the Radiologist dictation.
  • Finally, the credit goes to the Radiologist, amazing clinical skill at work. He is such a pleased and humble Radiologist to work with.
  • We found at extreme load with primitive infrastructure our system has some glitches, now our tech team has a lot to do.

The “Boss’s-day-out” was well spent, a good memory to relish for days to come.

Few critical problems and solution to consider while implementing Opensource PACS.

banner-radiology

As a CTO of Innowave, I visit many hospitals to understand and suggest improvements on opensource solutions especially PACS. Everything is hunky-dory, until a disaster is hit, after some basic understanding of the current setting I have put together five points to consider when you are implementing any opensource solutions especially PACS.

1. PACS is 50% software and 50% hardware especially storage, database, processing. Getting these specification right is very important.

Witnessed many healthcare institutions use desktop grade PC as Server and many use assembled computers, which is not designed for long hours and don’t provide the necessary performance under multi-processing environment.

  • Healthcare software should run for long hours ( 24/7 and 365 days) and many years (min of 3 years). Invest on reliable Hardware especially servers, use systems and monitors from reputed brand (DELL, IBM, HP).
  • Use RAID configured NAS systems (QNAP / SYNOLOGY) with iSCSI mapping to storing Images and Database instead on the application server, iSCSI provides faster access then high level file system like NTFS. Use NAS aware Hard-disks (WD-Red), they are designed to run long hours and have a very unique spinning technology that generates less heat and increases life time of the disks which is directly proportional to your data lifetime.
  • Separating Data (images and database) and Application adds more redundancy.
  • Ensure Vertical scaling is possible in the system, adding more CPU Power, Memory and Hardisk Space on a later date as the load picks up.
  • Factor in redundancy at hardware and network level. I recommend RAID 1 for Applications and RAID 5 for Data.
  • Proper network design is a key, a good hardware with a bad network will bring done the systems performance heavily. It is recommended to have VLAN configured so unwanted intrusion could be avoided from the hospital network.
  • At times work environment would use Internet access (Radiologist would like to access learning sites while reporting), this helps the co-workers to have access to the internet. This will kill the productivity and also bring in un-necessary malicious software. Have a proper firewall with Unified Threat Management (UTM) license and Intrusion Detection System (IDS), block all unwanted information. Some ISPs in India provide clean-connect-service part of their internet service, this will avoid extra investment on firewall at your premises.

2. Workflow, not all opensource provide the necessary workflow that fits your Radiology department, especially when it comes to Routing and Reporting. This needs additional software’s.

Workflow forms a critical part of PACS, providing access to Patient information via MWL to modalities, storing images in PACS,  routing right studies to radiologist, provide good reporting tool and instant access to old studies are some of the key aspects of PACS workflow. Radiologist hesitate to access multiple systems to accomplish their task. Providing a integrated solution is a key. Have listed few Opensource tools that can provide a integrated solution.

  • Many Opensource solutions do not offer complete package. Most PACS offer core PACS part and relay on other open source components to provide the rest. For example, DCM4chee is and excellent PACS with Osirix, Mayam, and Weasis as Workstations components.
  • When considering PACS, ensure basic IHE profiles are supported, the most important is the Scheduled Workflow profile.
  • Modality Worklist is one of the Key feature of the core PACS component. This will ensure the right patient information from the RIS is captured and delivered across the workflow. From my experience this also reduces the TAT grossly as the right patient is picked up in the chronological order. Generally technologist make the mistake of picking up the wrong order of patients and increase the TAT (Turn around Time).
  • Routing Rules, important to ensure that the right studies are delivered to the correct Radiologist on time for a lesser TAT.
  • Workstation is another component, there are hundreds of workstation based, they can be classified as 2D and 3D workstations. For 3D I recommend Osirix which works only on mac, for normal viewing I recommend Clearcanvas. For Web viewing user Weasis or Oviyam2.
  • For Reporting, Microsoft Word is an excellent tool with little scripting you can make Word to fetch the Patient information from the DICOM Dataset and populate them in the Report header and also load default templates based on the Study Description. This will greatly increase TAT and avoid typos.
  • Teleradiology : WADO and JPEG/JPEG 2000 combination plays a great role. Weasis with DCM4chee or Osirix in Server mode plays an excellent role.

For a standalone Imaging center with One modality and Single Radiologist setup independent Osirix or Clearworkstation is ideal.  Overall in a Multi-modality and multi-user environment DCM4chee with a combination of Osirix and Clearcanvas workstation plays a vital role with bit of customization on Modality Worklist interface and Reporting using Microsoft Word.

We have implemented DCM4chee based PACS along with our Freedom.Web workflow, Osirix or customised Clearcanvas Freedom.Workstation as workstation plus integrated Microsoft Word reporting, in which the Patient header and default report templates gets scattered based on DICOM Tags like Study Description, once finalised the report automatically gets stored in the NAS Archive in the Study Folder.

3. Security and HIPAA, simple HTTPs is beyond the scope of the software’s alone, it needs bit more than installing software.

Security is a key aspect of PACS, people take this for granted, ignore it or depend on Hospital IT Systems to take care of PACS Security, it is important to consider the following points from the PACS perspective.

  • Radiologist on many occasions would want to refer to Radiology learning sites to report their studies and insist on Internet access, this opens up heavy vulnerability to the system. We have to ensure proper firewall is installed and configured with UTM or Intrusion Detection System (IDS).
  • Disable access to removable media into the Radiology IT Systems. Devices like Floppy disks, USB thumb drives, external HDD should be completely banned from use. These are potential source of malware.
  • Have proper Anti-virus installed and updated frequently. Ensure the Windows Service/Security patches are updated periodically.
  • Use licensed software products (mainly in Asian context), discourage pirated operating system these generate loop holes into the system.
  • Use VLAN to isolate Radiology equipment’s from other Hospital networks. VLAN also provides faster data transfer.
  • Remote access for Teleradiology should be routed through a single Firewall with proper authentication. Ensure VPN or encrypted protocol like HTTPS are used to transfer images via internet.
  • Prevention is better than cure, a Network monitoring tool will help us to detect unwanted network traffic and ports withing the Radiology IT Systems.
  • Ensure all users have access to the system via a username and password to view images and reports.

4. Disastar recovery, not many people see this important until you are hit with data-loss. I have seen hospitals don’t invest on this, but spend thousands $$ when they get hit. Disaster recovery is not just storage – it includes Application and Database Servers. RAID, Server virtualization are some of the key features of DR.

Disaster Recovery is another big area that get a miss in an Opensource PACS implementation. The importance of DR is not realised until it is struck. Taking a tag like from the DR principle, if any IT system is down for more than 3 hours – has got a potential to loose customers, so the industry revolves around this magic 3 hours time line to restore back any IT system that is affected. Some key points to consider.

  • Separate Data and Applications, separation means having physical hardware for application and another one for data. In the event of Application dies the Data is intact and quickly restored.
  • NAS Box is a good way to store data this includes images and database. QNAP with WD RED Hard-disk is a economical and good solution.
  • Use VMs (virtual machines or server virtualization) to run applications, so it has better utilisation of Hardware and quick to restore. VMware V-Sphere esxi, is a good bare metal server virtualization.
  • Create an iSCSI Partition on NAS Box for Data and map these as drives to the Application VMs
  • Ensure no transnational or configuration data stored in the application VM, all these are stored and executed on the NAS Box. It is good idea to install the PACS application on the mapped iSCSI drive as all the configuration is stored here.
  • Create a snapshot the VM after any major update.
  • During Application hardware Crash, unlikely tough it is on RAID, recovery the VM from the latest VM snapshot backup.
  • For Database, set Full and Transactional backup on a daily and hourly basis respectively. Automatically move these backups to a external Harddrive connect to the NAS Box via a USB drive.
  • For images if you need additional backup (highly unlikely as they are on RAID5), we can set up a Realtime Remote Replication (RTRR) between two NAS Box.
  • It is essential that your IT team check the status of the RAID HDD on a daily basis. Check if the Database backup are copied to the external drive. Occasionally restore the Database and check for data integrity.

5. Last but the most basic stuff, is plan for migration. This again first time PACS users will ignore and will realize the moment they are hit with bottlenecks like storage space.

It is very difficult to deploy an IT system, the moment all stake holders get accustomed – it will be difficult for them to be without the solution even for a single day. So scaling the existing infrastructure is a constant change in any IT Systems. Scale always puts you either in a new hardware or a overall changing the current PACS software. It is essential to learn some key aspects of migration.

  • PACS migration is very tricky area, bit of internal understanding is required. Many opensource PACS have two types of data, they are Images and Database. The Images are DICOM images either in the RAW format or compressed based on the configuration. The Database hold the index of the Images grouped in Patient Information model as per the DICOM Standards. It maintains an hierarchy of studies, Series and Images and also the path of each study in the respective storage device.
  • Mostly the Image is stored on a folder like structure, having Study Instance UID as the folder name. The database will have the path of each folder with respect to the study. It is relatively easy decrypt the image portion when compared to the database portion.
  • Migrating the hardware and having the same software is relatively simple as you can reuse the same old data. Check my blog for migrating a old Dcm4Chee to new Dcm4chee hardware
  • Migrating to a completely new system is bit more complicated, but since DICOM is an open standard it is possible to migrate from old PACS to a completely new PACS using DICOM Query Retrieve option. The process is to deploy a workstation in between, query the old studies for a time period, retrieve the images locally in the workstation and then push back to the new PACS. This will ensure the data is migrated but time consuming. The same process could be followed with some automated scripts easily using Mirth.
  • There are vendors like us who can provide you the necessary migration tools to help migrating from old PACS to another completely new PACS.

These are the few areas I find bit more emphasize, if you are very serious in implementing open source PACS. The good news is there are people and companies like us who can help you to overcome all these in Opensource solutions.

We @ Innowave, have implemented DCM4chee based PACS along with our Freedom.Web workflow, Osirix or customised Clearcanvas Freedom.Workstation as workstation plus integrated Microsoft Word reporting, in which the Patient header and default report templates gets scattered based on DICOM Tags like Study Description, once finalised the report automatically gets stored in the NAS Archive in the Study Folder.

With the points discussed about, any Tech savvy person can deploy and maintain a enterprise PACS completely from Opensource components, when we can do it why can’t you do it. For more information please do email us.

Teleradiology concept now leads to Tele-Technologist ?

In India, we have problem with Radiologist availability at remote locations, but given the opportunity for qualified CT /MR technologist from Middle and Far East, well trained and qualified technologist are now relocating for a better opportunity abroad. This creates a huge vacuum and need for  Remote Technologist.

Tele_Technologist

Since Innowave Healthcare is in the business of providing Turn Key solution for Radiologist departments, we got request to share Technologist. An experienced and qualified Technologist could be placed in a Command Center operate CT/MR consoles remotely based on the request from Remote Radiology centers. This is very similar to Tele-radiology, but here we share Technologist not Radiologist.  Can we term this “Tele-technologist”?

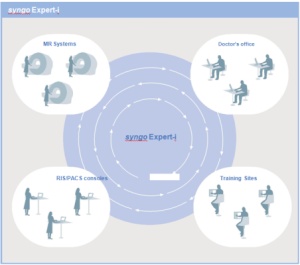
One of our customer has a Siemens MR and CT, we spoke to the vendors and discovered a solution, Expert-i from Siemens.

Have real-time access to the Modality Console suite from any-where in the network.

 syngo Expert-i is a Siemens-unique solution that lets physicians interact with MR exams in progress from vir-tually anywhere in a hospital environment. After installation, the expert can simply log on as a remote user with an ID and password. From there they can view the entire patient setup, imaging data, and all sequences performed in real-time. syngo Expert-i provides full-screen displays and allows total mouse control. syngo Expert-i is available for all MAGNETOM systems:

MAGNETOM Avanto, Espree, Trio, Symphony, C!, Concerto, Sonata, Harmony and Allegra.

All of the following software versions support Expert-i: syngo MR 2004A, 2004V, 2005E, 2006T, syngo MR B13, syngo MR A30.”

We tried Expert-i and found few limitations.

  1. Not available in all Siemens Modalities, only selected model listed above have this feature.
  2. Every remote connection should initiated by the Technologist from the Console.
  3. There is a time limit of 120 seconds duration, means the remote session is available only for 2 minutes.
  4. Every session has new password.

These limitations lead to huge bottleneck for our concept.

How we overcame this Limitations.

We did some internal analysis on Expert-I feature and found Siemens used customized implementation of UltraVNC.  UltraVNC is not open source, it is licensed and creates quite a few dependencies. Since the access to Siemens console is highly regulated and needs Siemens engineers help to get access to Windows Environment, we had to use a less complex Remote Desktop client listed below.

After a few goggling, found TightVNC is a best fit. After a few failed attempts, we managed to configure a secured Remote Desktop connection between Siemens Modality Console and a Windows computer via TightVNC over a VPN. I guess this can be extended to any Console as long as we have access to the operating system environment and vendors cooperation.

Today, my client is happy and not dependent upon having an experienced Technologist at every remote location during night time / emergency periods or now need not recruit a Technologist.  This is a classic exzmple of Innowave’s vision to provide best possible solution at affordable cost.

DCM4CHEE PACS Migration made easy in couple of hours.

We at Innowave are remotely manning couple of Radiology Workflow solution for Hospital and Diagnostic centers in Singapore, Middle East and India.

A 300 bed hospital in South India gave us an opportunity to implement Radiology workflow Solution. The workflow covers the entire workflow starting from Radiology Registration, Modality work-list integration, Image Storage, Local and Remote viewing, Reporting and Physician access.  Without going much into details, we had forced with a challenge to migrate the old studies.  One of our key unique selling points was to view prior studies.

After few hours of  Google search, we found migration solutions are expensive and time-consuming.  Our team started to dig the existing PACS solution and found a best, easy and reliable way to migrate all studies.

Plan for Migration, is to export all studies from the old Linux based DCM4CHEE PACS on to a new Windows based DCM4CHEE PACS. 

 Challenges :

  1. LAN Speed: The site had a very old network infrastructure, complete hospital is wired on CAT 5 cables, and the max network bandwidth is @ 80 Mbps.  During busy working hours the bandwidth  drops down to 5 Mbps.
  2. Hardware: The existing PACS hardware was relatively low powered and almost reached its “end of life”.
  3. Zero Downtime: This site is already film-less, customer was very particular on Zero downtime, means a single study should go unreported. So the only best time we had to work is after 10:00 pm till 8:00 am in the morning.
  4. Knowledge on Linux and DCM4Chee Software: The existing PACS were on Ubuntu, we had zero experience on using Linux systems.
  5. Migration: Data integrity is the key issue. Don’t want to lose even an Image.

Infrastructure

  1. Existing PACS Server: The old server is an Intel Dual Core with 2 GB of DDR2 RAM, 2TB Single hard disk, (No redundancy), Ubuntu 64-bit Operating System.
  2. LAN: CAT 5 Network, the hospital was reluctant to upgrade the network as it would cost a bomb.
  3. New PACS Server: Intel Xeon 6 Core, 8 GB DDR3 RAM, 5.7 TB of RAID 5 Storage, Windows Server 2012.
  4. Database: We decided to retain the same MySQL database as back-end even though MsSQL Server was our default choice, reason – for reliable migration.

Migration Data Size:

  1.  2 Years of Patient Data.
  2. Modalities : 1 Multi slice CT, 1 .35T MRI, 2 X-ray units with a CR and 2 Ultrasound systems. All systems are DICOM compatible.
  3. Approximately One TB of J2K Lossless compressed data. The potential raw data size could be above 2.5 TB.
  4. Approximately 70,000 Patients with over 1.2 million images.
  5. Database File Size is 900 MB.

Why moving to Windows Platform from a very stable & affordable Linux box.

There is a limitation running DCM4Chee on a Windows 64 bit platform using Image Compression. The Java Image IO will support only 32 bit JDK, this results in maximum accessible memory up to 2 GB per process. Even though the Hardware has 8 GB of RAM but DCM4Chee can max utilize 2 GB of memory.

In spite of this huge limitation, why we wanted to migrate out of Linux, the key was easy support and maintenance of the entire solution. Hospital IT staffs are familiar only with Windows Server environment, all other HIS, CMS, Payroll and Accounting solutions run on Windows Server environment. So the natural choice is Windows.

We also did a peak load analysis. DCM4Chee never consumes more than 1.5 GB of memory. We use only pure DICOM Services C_Store, C_Find and C_Move. Occasionally we use WADO for Physician access. Images are Jpeg 2000 compressed  on the Fly during C_Store and archived to Storage location.

Why MySQL Database

The old database is MySQL, it makes sense to export and re-import the same database into the windows box. This will clear many data integrity checks. There is also an option that we did evaluate MsSql Express 2012. But we decided to go for MySQL for compatibility with old data.

Steps followed for DCM4Chee migration.


1. Install DCM4Chee on the New Server.

For a novice to implement DCM4Chee PACS is quite a task, we had failed few times before we can succeed.  We followed the steps explained in this link .

Some Tips.

  1. These are the components we used for this setup. (Download link)
    • jtds-1.3.1-dist
    • JDK 32 bit (jdk-7u25-windows-i586 ) as we are using J2k compression.
    • JBoss-4.2.3.GA
    • Jtds-1.3.1-dist
    • dcm4chee-2.17.1-mysql
    • dcm4chee-arr-3.0.11-mysql
  2. If you are installing on a Windows 64 bit and would like to compress the archive, then install 32bit JDK.
  3. Make the necessary changes suggested in section (8. Mac OSX and Windows x64 specific changes for the WADO service), in the Installation manual.

After some basic test as suggested in section (16. Test DICOM storage & 17. Test object retrieval) sections of installation link.  Now the system is ready for Data Migration.

2. Migrate Images

Find the old archive location for the Online Storage.

  • Identify the Archive location. Lucky in old server there was only one Online storage location.
  • Open JBoss console http://localhost/jmx-console, login and under dcm4chee.archive select ‘group = ONLINE_STORAGE.service = FileSystemMgt’.
  • Below click on listAllFileSystems(), this will list the list of file systems and their absolute path.
  • The output should look similar to this “FileSystem[pk=1, X:\Freedom_Pacs\Studies, groupID=ONLINE_STORAGE, aet=FREEDOM_PACS, ONLINE, RW+, userinfo=null, next=]”
  • “X:\Freedom_Pacs\Studies” is the root folder for the Images.

Share Archive folder.

  • The best way to copy these images are by creating a Read only Network share. Do not allow everyone access, restrict access with a user rights.

Copy the contents of Old Archive folder to the new PACS Archive location.

  • We had challenge in copying these files over the network, the data transfer was clocking 4 MBps, which could have resulted close to 2 days of copying as there are over 1.2 million folders and files.
  • Since both the server had Gigabit network cards we tried a network cross cable, using this we copying speed hit 40 – 70 MBps / Second.
  • We decided to copy the images to a RAID 5 storage location for data redundancy.
  • Once the copying was done we check the no of files and folder copied and their storage size to verify all images and folders are copied.  Right Click on the root folder and select Properties to get this stats.

This completes the Image Data migration.

3. Migrate Database

Install SQLWorkbench in both server.

  • MySql WorkBench 6.0 is an excellent tool for creating and managing MySql database. This tool can be downloaded from this link.

Export DCM4Chee Database

  • Execute WorkBench and select the localhost as your database to operate.
  • click on Management section and then on Navigator section. Select Data Export option, this will popup the list of database in the DB Server.
  • Select “PACSDB” from the list, select the export location and click on Start Export.
  • This will take couple of minutes to export the Schema and the data to the designated location.  The time to copy is based on the database size.

Copy the folder to the new server.

  • Using the same network share created to copy images, now copy the Exported DB Sql dump to the new Server.

Import DCM4Chee Database

  • In the new PACS server, Execute WorkBench and select the localhost server as you database to operate
  • Click on Management section and then on the Navigator section. Select Import / Restore Option.
  • Select the option “Import from the Project Folder”, choose the folder recently copied to the new PACS Server.
  • This will display the “PACSDB” database in the list “Select Database objects to import”.
  • Select “PACSDB” from the list and click on Start Import.
  • This will take couple of minutes to export the Schema and the data to the designated location.  The time taken is based on the database size.

Tip : This takes 3x more time then export,  could be because of inserting the records and Write speed. But what also makes us bizzar it is resetting the AE title to DCM4Chee.  This completely disarrays the Database linking.  The last section will deal how to fix this.

This completes the Database migration.

4. Assign Images and Database to the New Server.

By migrating the database and copying the Image archive, the new PACS server is all set for coupling the database and Image folder to the new PACS Server. Start DCM4Chee in the new server and follow the instructions below.

Assigning the Database to the DCM4Chee.

  • If you have not changed the Default Name of the database “PACSDB”, then the database is intact to fire the worklist.  You can check this by login as user http://localhost/dcm4chee-web3

Assigning the Images to the DCM4Chee.

The next is to link up the images. I read a lot about in DCM4Chee forums to modify the archive storage location and none had worked. So decided to debug the database.  Followed these steps to update the archive root folder.

  • Open MySql Workbench 6.0.
  • Select the localhost server as you database to operate.
  • In the Navigator section, select schemas and PACSDB from the database list.
  • Expand this tree node  until you see the list of tables.
  • Select FileSystem table, this holds the list of Archive locations and their absolute path.
  • Browse the data, by Right click and select top 1000 records.
  • Ideally you should have one record with pk value = 1, change the directory path column as your Archive root folder eg X:\Freedom_Pacs\Studies.
  • This path is the root path, under this you will have the folder that holds the images at the Year level. Lets say 2012, 2013, etc…
  • The relationship between the table “file” and table “filesystem” plays a major role is identifying the image location.
  • Actually speaking, the previous step should end the migration, but for some weird reason during the import phase, the AE Title is reset back to DCM4CHEE  instead of the old FREEDOM_PACS.
  • It is highly recommended to retain the old AE title, IP address and the Port No for the new PACS. Why, it saves lots a lot of time to reconfigure any modality or workstation as it add less misery to any PACS migration.

Technically this ends the complete migration, but to our surprise during Database import the script resets the AE title of the Study, Series and Images (Files) to the default DCM4Chee.  If we do any DICOM communication, the client will report a Peer DICOM rejection error – invalid AE Title. The worst is, “during this time any WADO query can crash the entire DCM4CHEE service”.

This issue almost made us to abandon this migration plan, thanks to my team’s fighting energy- they found a work around and that is listed below. 

To change the AE title back to FREEDOM_PACS we, followed these steps.

  • Open JBoss console http://localhost/jmx-console, login and under dcm4chee.archive select ‘service=AE’.
  • Scroll down till void updateAETitle(), enter ‘DCM4CHEE’ in prevAET and ‘FREEDOM_PACS’ or the AE title of the old PACS in newAET.
  • Now click on Invoke, this took close to 20 minutes to complete its execution.
  • Post this we have the complete solution working.

Conclusion

We tried this for couple of times to ensure that we have migrated all the data, our engineers could finish the migrating in less that 3 hours, though the first attempt with a huge learning took us close to 3 weeks. We have successfully migrated all studies and did some random test to confirm clean migration.

We wanted to document this so that, the 3 weeks of effort could be saved by fellow users in near future. Please write to me if you have any clarification or corrections.

Creating a DICOM Router in 15 minutes using Mirth Platform

1 Why a Flexible DICOM Router

We at Innowave are remotely manning couple of Radiology Workflow solution for Hospital and Diagnostic centers in Singapore, Middle East and India. Invariably we get request to keep assigning DICOM studies to various locations within the network on WAN or LAN.

The Assigning Rules kept changing very frequently & was tired to keep changing my DICOM Router Code. Desperately looking for a more flexible and customizable DICOM Router in the open source community.

Then came across this web page, how to build a DICOM Router using Mirth Platform. This was a blessing for my pain, caught on with it and did a complete study on Mirth Platform. I must admit, Mirth is such a useful platform for non-programmers to build quick solution. This Platform is really a asset to the Radiology community.

Since I realized Mirth’s potential, wanted to share this with the community with an example. Read below to how to build a DICOM Router in 15 minutes without any programming knowledge. Please feel free to write to me for any queries at rady@innwoave.in.

2 Steps to Build a DICOM Router in 15 Minutes

Use Case :

Request from a customer to view the images using a Clearcanvas Workstation and also have a copy of all the images pushed to workstation in a folder. The Images should be in separate folder for every patient irrespective of the study and modality.

This use case was much wired, but customers requested this for a clinical study.

Prerequisites :

  1. Download and Install Mirth from this location. Please download the installer not the zip version. Zip needs bit more learning to start the Mirth Service and the Administrator Manager.
  2.  Basic idea of how to get Mirth Started is available in these Links
    1. Key Components of Mirth.
    2. Getting Started with Mirth Guide
  3. The next step is how to use the Mirth Connect, though this link is off track from our work explaining HL7 Server but give you a good start of Mirth Connect.
  4. Concentrate on Creating Channels and its Transformations and steps. These are some of the very important concepts of Mirth and adds great amount of flexibility. The best way to get help on Mirth Topic is to click on item “Help on this topic” on the left pane of Mirth Connect Administrator.

Actual DICOM Router in Making…

  1. Create a DICOM Server under Mirth that will receive images from any modality. Mirth uses DCM4Chee3 DICOM Server, so it will be able to handle all DICOM request. DICOM details for this server: AE Title is AETITLE, Port No 104 on your local PC.
  2. Two destinations are created one to the Clearcanvas Workstation installed locally and the second one will write to an Innowave folder in C Drive. Each Study will be created under a new folder, name will be Patient Id.
  3. This link has the entire channel exported to an xml file, download this channel, import in Mirth Connect Administrator.

Play around with the channel,  you will be able to learn a lot of features on Mirth Connect. This platform is highly configurable, and easily deployable. The downside I could visualize is the performance, tested with CT, MR, CR, US from One image to 600 images in a study. Not sure how this will perform for large studies like peripheral Angios.

Mirth is multi-platfrom and could work across Windows, Linux and Mac environments.